
Goal
Create a page listing vendors that will be automatically updated whenever a vendor is added, deleted, or updated on the site.
Prerequisite knowledge
- Section 9.1, “Concept: Uses of Views”
- Section 9.2, “Concept: The Parts of a View”
Site prerequisites
- The core Views and Views UI modules must be installed. These are installed for you when you install with the core Standard installation profile.
- The Vendor content type must exist, with URL and Main image fields. Your site must have a couple of Vendor content items. See Section 6.1, “Adding a Content Type”, Section 6.3, “Adding Basic Fields to a Content Type”, and Section 5.2, “Creating a Content Item”.
- The Medium (220x220) image style must be defined. This is created on your site when you install the core Image module (installed with the core Standard installation profile) but can be recreated if deleted. See Section 6.13, “Setting Up an Image Style”.
Steps
- In the Manage administrative menu, navigate to Structure > Views > Add view (admin/structure/views/add). The Add view wizard appears.
Fill in the fields as shown below.
Field name Explanation Example value View basic information > View name Name of the view that will be visible in the administration pages Vendors View settings > Show Type of information listed in the view Content View settings > of type Specify content type Vendor View settings > sorted by List order Title Page settings > Create a page Create a page that displays the view Checked Page settings > Page title Title show above the view Vendors Page settings > Path Address of the page vendors Page settings > Page display settings > Display format Type of list Table Page settings > Items to display Number of items visible on the page 10 Page settings > Use a pager Split up the list in several pages if there are more items Checked Page settings > Create a menu link Add the view page to the menu Checked Page settings > Menu Menu in which to add the link Main navigation Page settings > Link text Label of the link in the menu Vendors 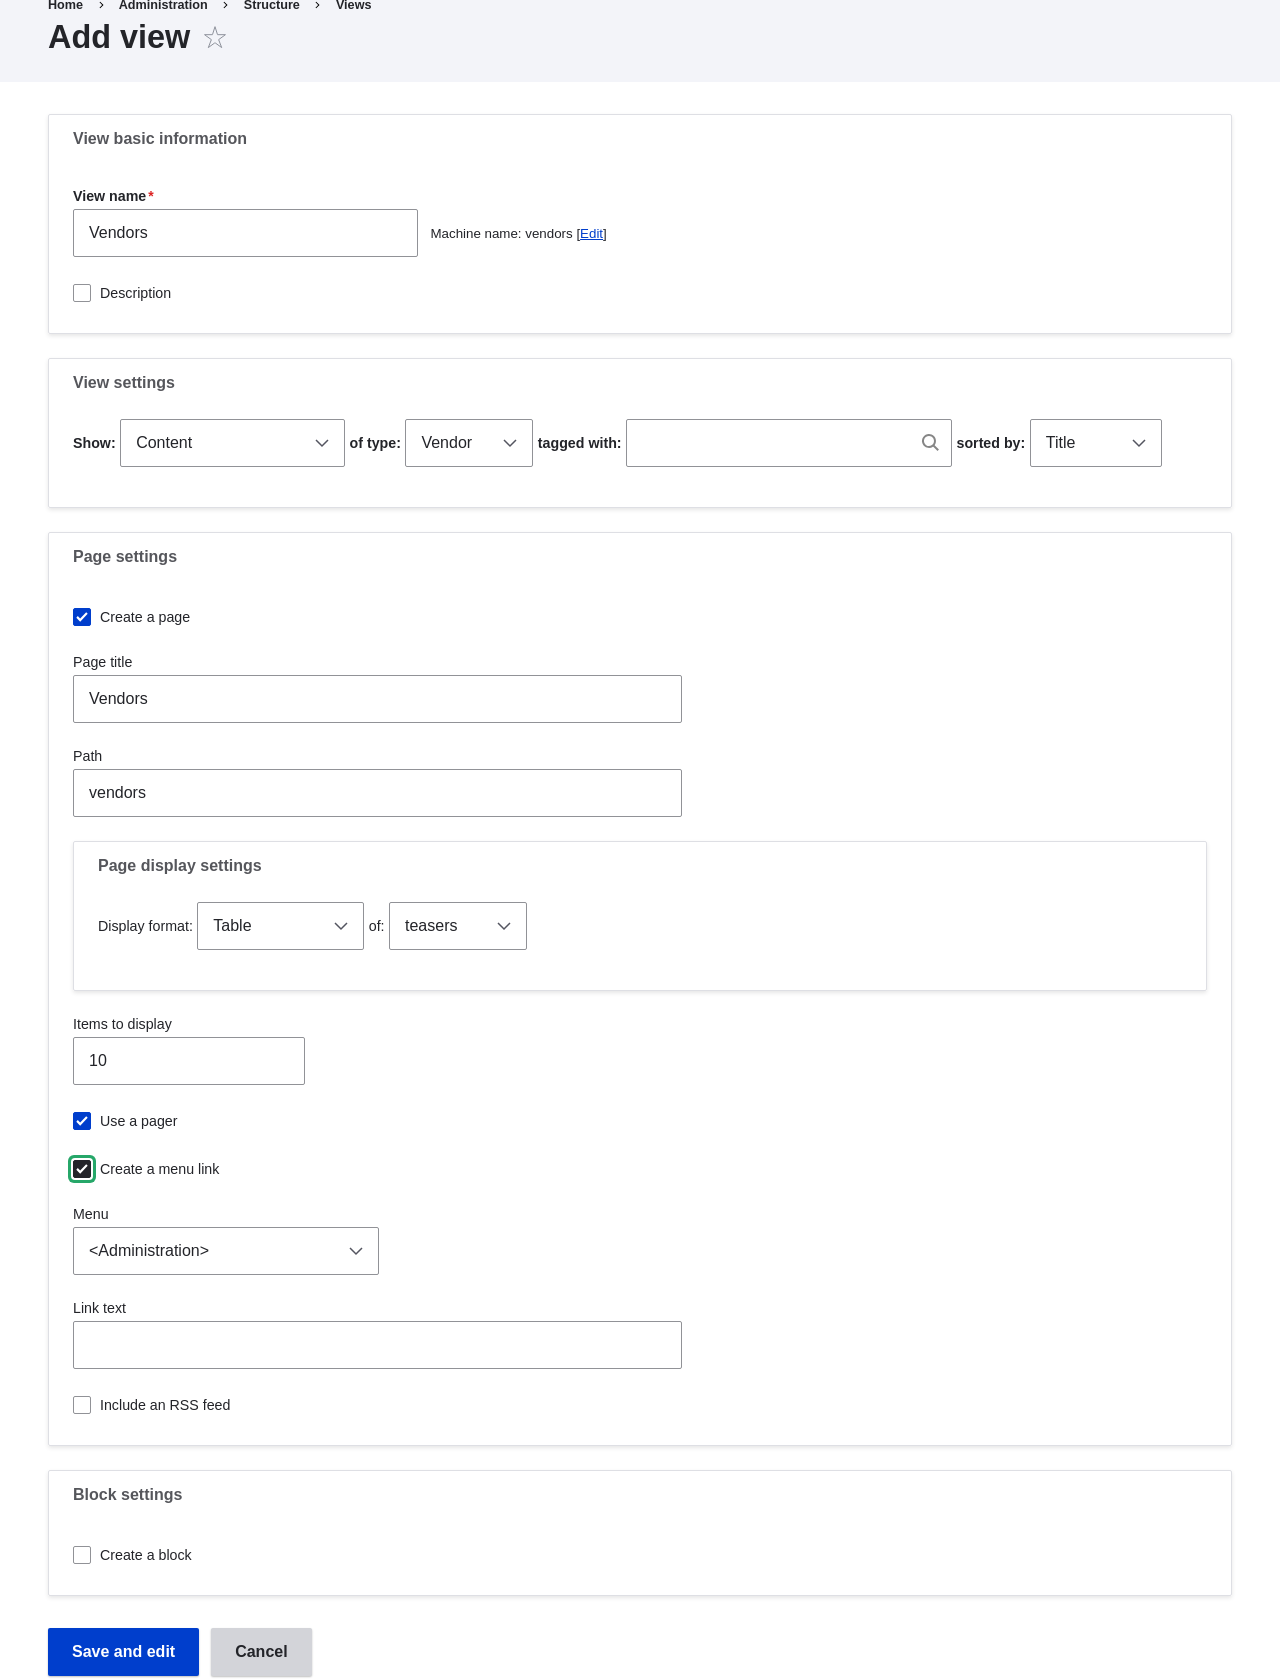
- Click Save and edit. The view configuration page appears.
- Under Fields, click Add from the dropdown button. The Add fields pop-up appears.
- Enter the word "image" in the search field.
- Check Main image in the table.
- Click Apply. The Configure field: Content: Main Image pop-up appears.
Fill in the fields as shown below.
Field name Explanation Example value Create a label Add a label before the field value Unchecked Image style The format of the image Medium (220x220) Link image to Add a link to the content item Content - Click Apply. The view configuration page appears.
- Under Fields, click Add from the dropdown button. The Add fields pop-up appears.
- Enter the word "body" in the search field.
- Select Body in the table.
- Click Apply. The Configure field: Content: Body pop-up appears.
Fill in the fields as shown below.
Field name Explanation Example value Create a label Add a label before the field value Unchecked Formatter The presentation of the field value Summary or trimmed Trimmed limit: The number of maximum characters shown 120 - Click Apply. The view configuration page appears.
- Under Fields, click Content: Title (Title). The Configure field: Content: Title pop-up appears.
- Uncheck Create a label. This will remove the label that was created by the wizard.
- Click Apply. The view configuration page appears.
- Under Fields, click Rearrange in the dropdown button. The Rearrange fields pop-up appears.
- Drag the cross bar handles of fields to put them into the right order: Image, Title, Body. As an alternative to dragging, you can click the Show row weights link at the top of the table and enter numerical weights (fields with lower or more negative weights will be shown first).
- Click Apply. The view configuration page appears.
- Optionally, click Update preview for a preview.
Click Save.

Navigate to the homepage and click Vendors from the main navigation to see the result.

Expand your understanding
The link to the view in the main navigation will probably not be in the right place. Change the order of the menu links in the main navigation. See Section 5.7, “Changing the Order of Navigation”.